Freezer Meals: The Ultimate Guide to Cooking Once and Eating Twice
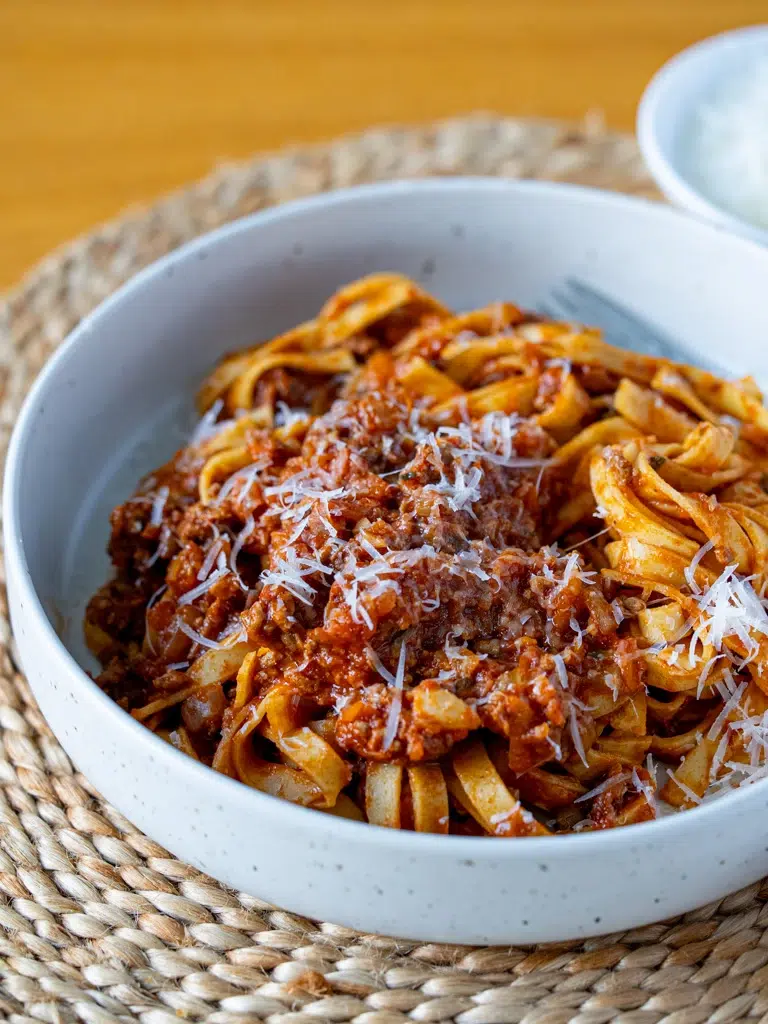
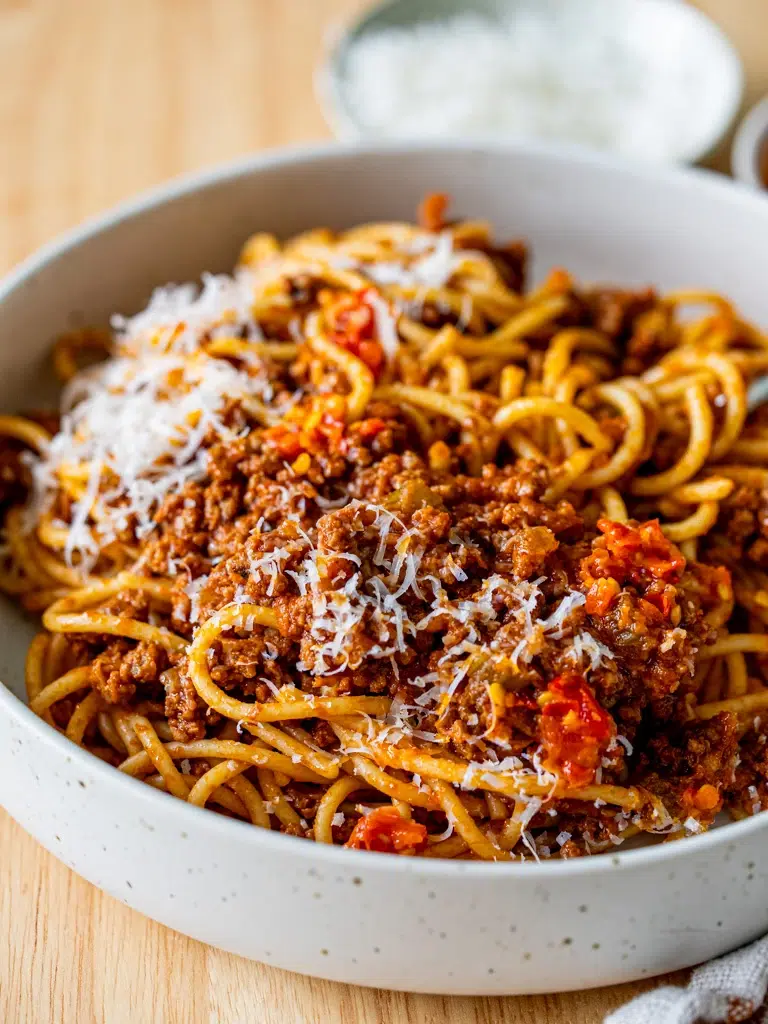
This Slow-cooker Beef Ragu is peak freezer meal energy – all the flavour, none of the effort. A big warm hug from Past You, straight from the freezer.
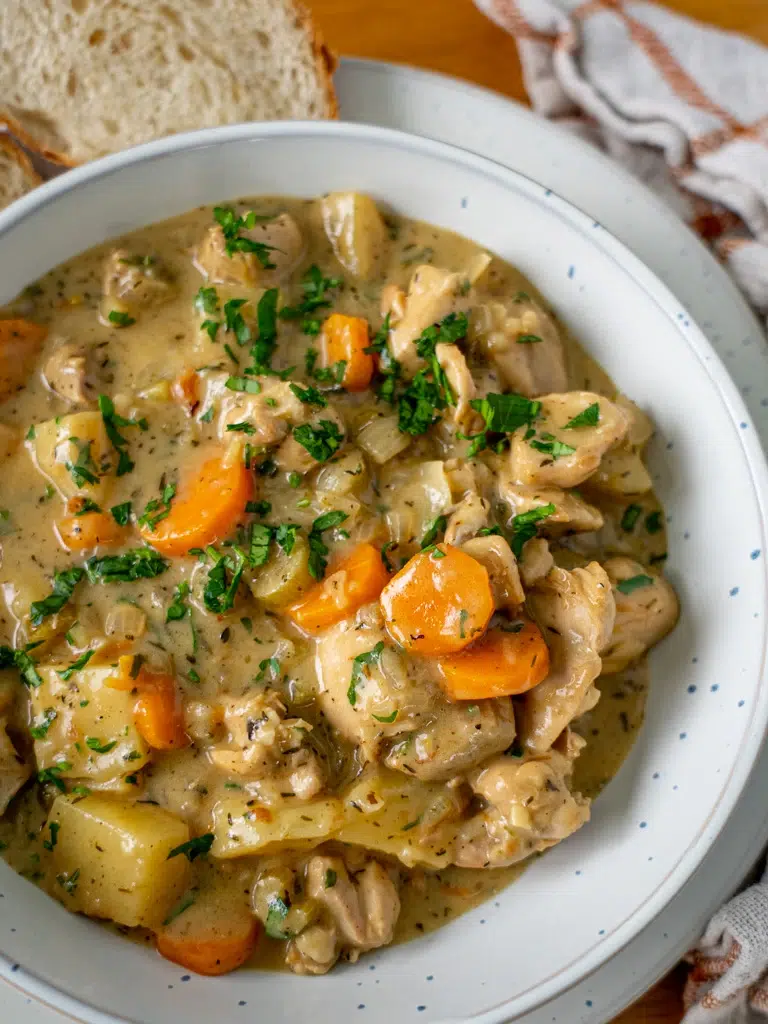
Imagine coming home after a long day, exhausted, hungry and staring at the fridge with absolutely no motivation to cook. Now imagine opening the freezer and pulling out a delicious, home-cooked meal that’s ready to go after just a fewminutes of reheating – luckily, Past You remembered to chuck that frozen meal into the fridge to thaw overnight, which was 1 minute well spent! That’s the magic of freezer meals. This might sound crazy, but a loaded freezer is one of the best forms of selfcare I can give myself.
Freezing meals isn’t just about convenience, it’s about lifting the load, both physically and mentally. It saves time, reduces stress, cuts down on food waste and keeps me from resorting to expensive takeout! When life gets hectic, having a stash of homemade meals in the freezer means one less thing to worry about. It’s meal planning at its finest – cook once, eat twice (or more!), and make dinnertime feel effortless. Why do all the work from scratch every night when you can prep once and coast through the week?
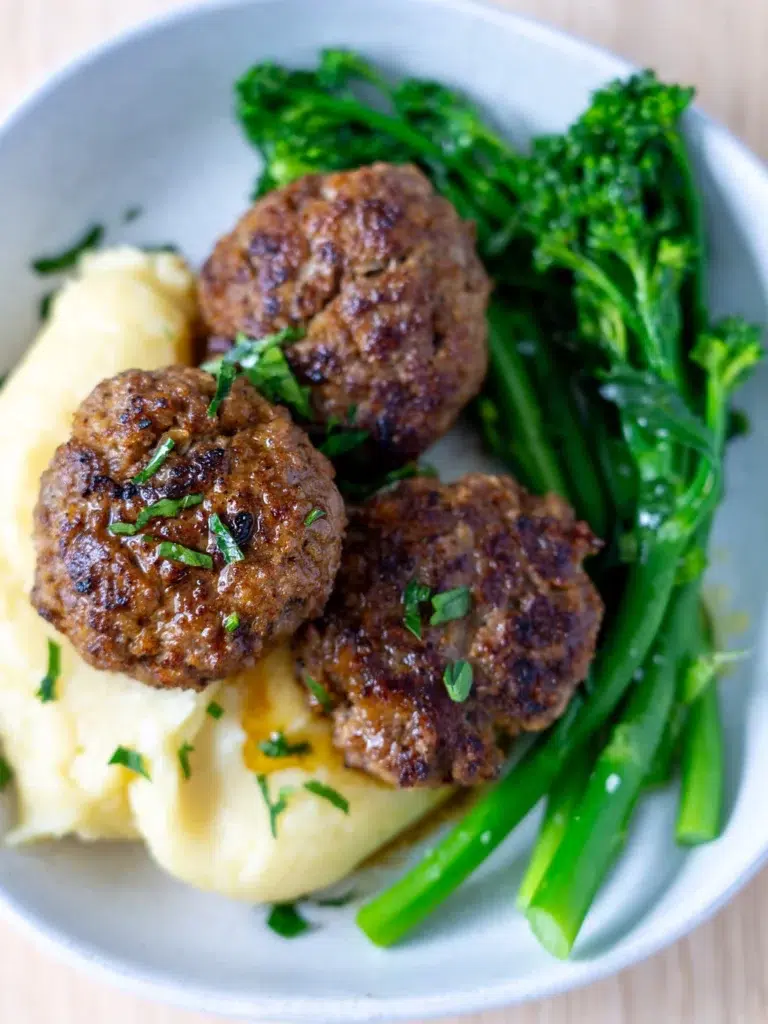
Why do all the work from scratch every night when you can prep once and coast through the week? These Freezer-Friendly Chicken Schnitzels are proof that a little prep now = future you winning at dinner time.
Utilising the freezer also means fewer dishes, fewer last-minute grocery runs, and more time spent doing … well … anything other than stressing about what’s for dinner. Whether you’re a busy parent juggling work and school schedules, or a professional trying to avoid another sad desk lunch, freezer meals give you the flexibility to eat well without the daily effort.
My rule is simple: if I love a recipe, I want to be able to freeze it. But let’s put it out there – freezer meals have a bit of a reputation. If you’ve ever enthusiastically prepped a meal only to defrost a sad, grainy, flavourless disaster weeks later, you’re not alone. Freezing meals is an absolute game-changer, but it’s also wildly misunderstood.
But fear not! I’ve got you covered with everything you need to know about stocking your freezer with meals that freeze brilliantly and actually taste good:
Correct freezer temperature
How to organise your freezer
The basic rules for freezing food
How to thaw and reheat properly
Making meals to freeze
A list of some of my favourite freezer meals
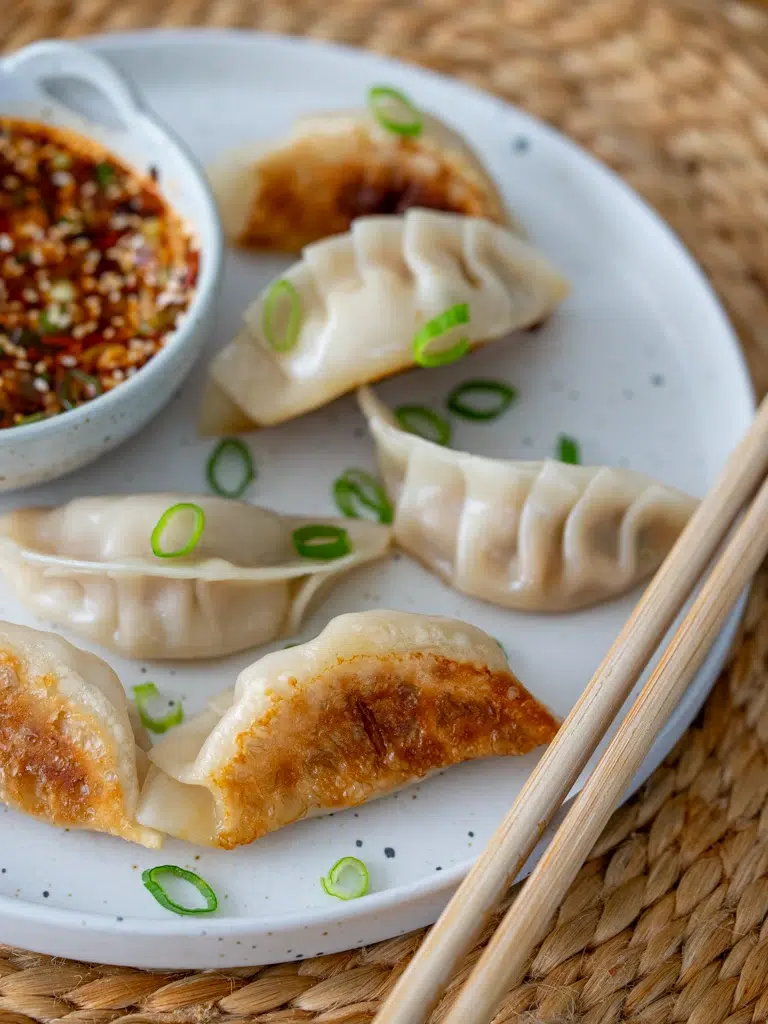
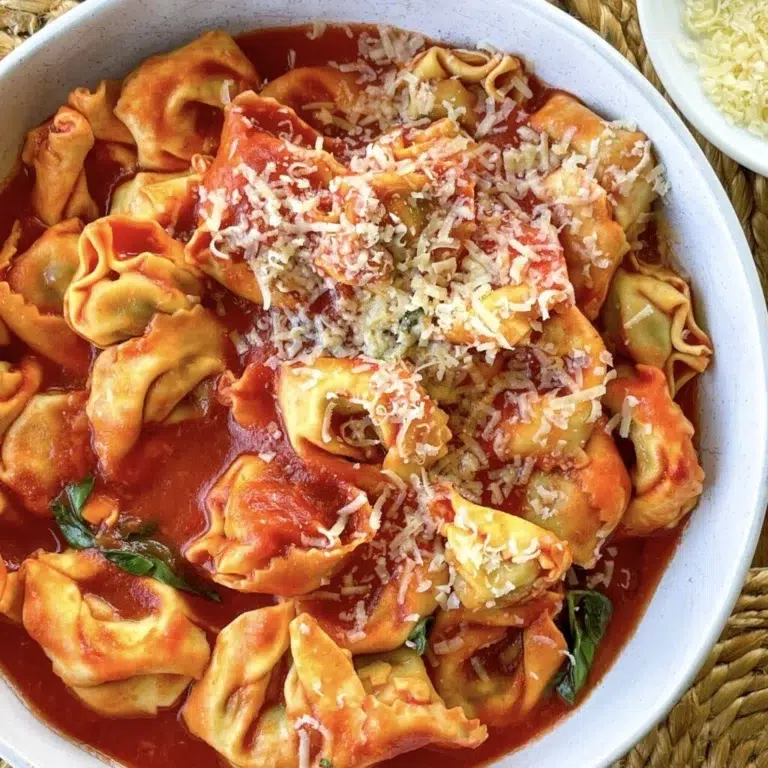
This guide covers everything you need to know about freezing food properly – from safety to texture to flavour. And yes, these Pork and Cabbage Dumplings freeze beautifully. Eat them as-is, toss into soup or turn them into a full meal – total freezer MVP.
First Things First: Make Sure Your Freezer Is the Correct Temperature!
Your freezer should be set to –18°C (0°F). Check the temperature of your freezer regularly, especially if you notice that food doesn’t seem cold enough. If it’s too warm, food won’t freeze properly and you’ll end up with icy build-up or spoiled meals. Most freezers have an inbuilt thermometer, but if you’re unsure, a fridge/freezer thermometer is a handy tool – small investment, huge peace of mind.
Freezer Organisation
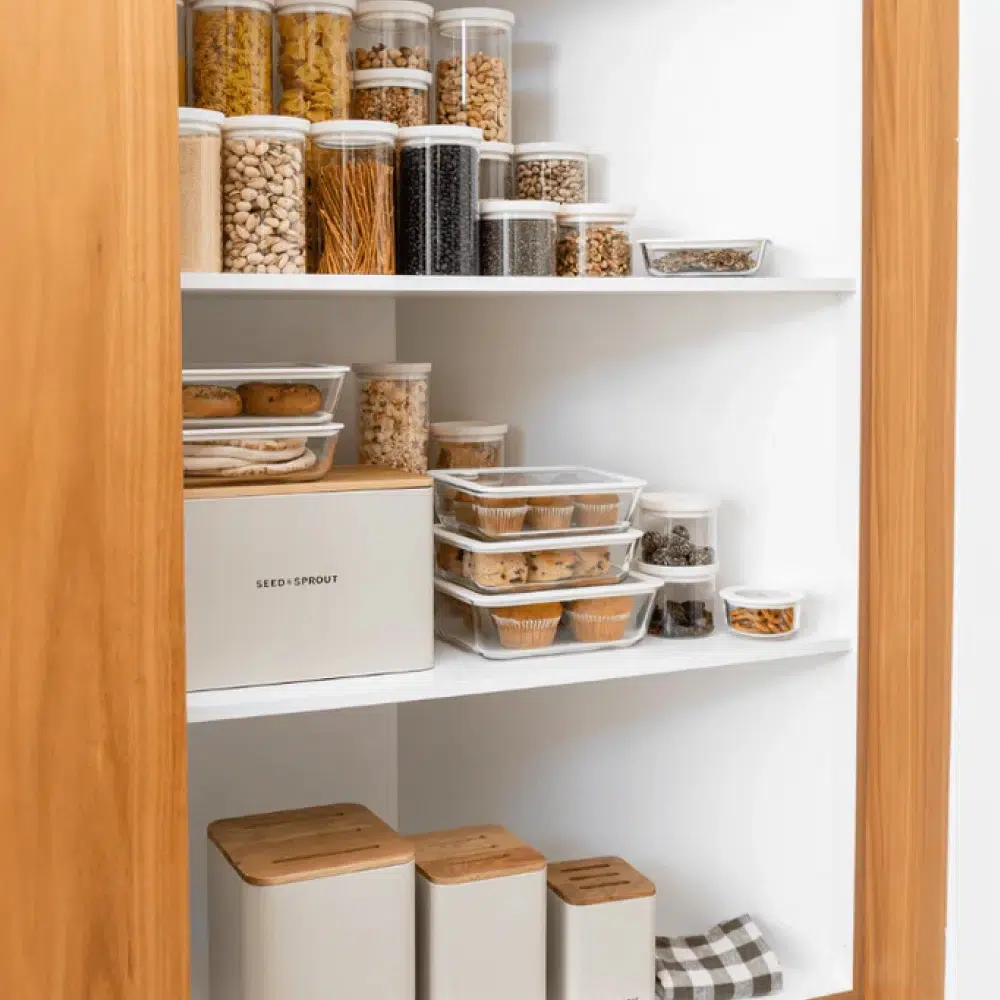
Before we get into what to freeze and how to freeze it, we need to talk about the freezer itself. A little organisation up front can save you from future frustration, and what I like to call the dreaded “freezer shuffle” – you know, when you’re digging through a pile of containers trying to figure out what’s still good and identify the mystery beige thing right at the back. Good freezer organisation will save you time, money and food (less or no wastage).
Clean out your freezer
Take everything out, toss anything freezer-burnt, unidentifiable or long forgotten, then give the freezer a quick clean. Warm water and a drop of dish soap is all you need – wipe down shelves, drawers and seals with a cloth, then dry thoroughly. A clean freezer runs more efficiently, keeps your food fresher, and makes it easier to see what you actually have.
Organising large and small freezers
How you organise your freezer will depend a lot on the space you’re working with. Whether it’s a big chest freezer or one above or below your fridge, grouping items into clear categories is the key to making it work harder (and stopping food from getting lost in the abyss).
Tips for larger freezers
Create dedicated zones – Use baskets, tubs, or drawer dividers to group items by type: cooked meals, raw proteins, vegetables, sauces, snacks, baked goods etc.
Think accessibility – Keep frequently used items (like dinner staples or lunchbox snacks) in the top drawers or front sections, and regularly rotate older items to the front so they get used first.
Use containers to prevent chaos – Group smaller loose items (like half-open bags of peas or frozen herbs) into bins or reusable sandwich bags so they don’t float around.
Stack smart – Store things like flat-frozen stews or minced (ground) meat upright like folders in a filing system. Label the top edge so you can grab what you need at a glance.
If you have a huge freezer, keep an inventory – This might be overkill and I don’t do it, but could be very helpful to someone who relies on their freezer a lot.
Tips for smaller freezers
Keep it simple – You might not have room for bins, but a few small containers can still make a big difference. Think: one for cooked meals, one for frozen veg, one for snacks or bread.
Use flat storage to your advantage – Freeze sauces, minced (ground) meat, or soup flat in reusable sandwich bags, then stack them vertically in a basket or shallow container to save space.
Put the oldest items at the front or top – It’s easy for small freezers to become cluttered quickly, so make a habit of rotating things weekly.
Label and consolidate – Avoid having five half-used bags of the same thing. When you notice duplicates, combine them, reseal and label clearly with contents and date.
And no matter what size freezer you have, the golden rule is this: USE IT! A well-organised freezer is only helpful if you actually dig into it regularly. Make it part of your weekly rhythm, and it’ll repay you in saved time, money and stress.
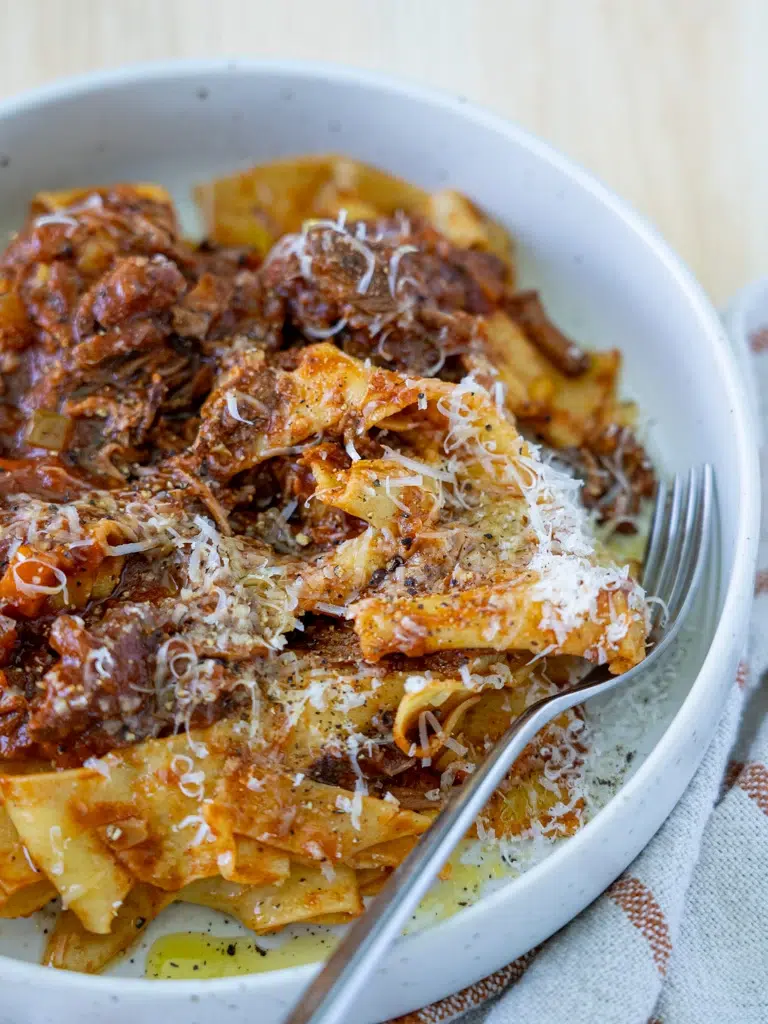
Freezing food can feel a bit overwhelming at first, but I’ve included all the details you need to do it right – plus how to reheat for the best texture and flavour. You’d never know this Hidden Veggie Bolognese came out of the freezer.
The Basic Rules for Freezing Food
Let’s face it. It’s really important to freeze food correctly for safety and also for the best results when it comes to thawing, reheating and eating.
What foods should you not freeze?
Not everything loves the freezer – and while some things can technically be frozen, the results aren’t always worth it. Here’s a list of foods I generally avoid freezing, based on texture, taste or safety. Let’s get these out of the way so we don’t waste time on them.
Leafy salads and fresh herbs – These wilt, go dark and lose all texture. If you’re freezing herbs, chop and freeze them in oil or stock in silicone trays instead.
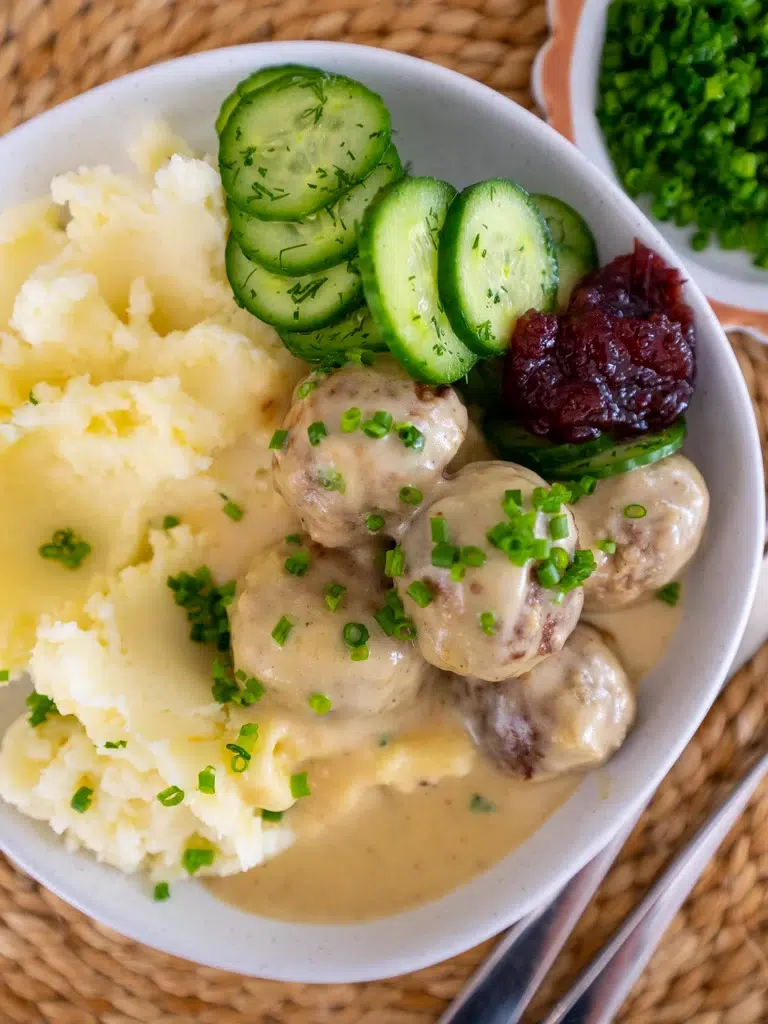
Watery fruits and vegetables – Things like cucumbers, celery, watermelon and raw tomatoes or potatoes don’t freeze well. They go mushy and weep when thawed. Mashed potatoes freeze beautifully, but raw or boiled potatoes? Not so much.
Avocados – They turn brown and watery once thawed. The texture just doesn’t hold up unless they’re mashed with lemon and frozen for things like guacamole.
Eggs (in the shell) – They expand and can crack open. Even when cracked first, raw egg whites and yolks tend to separate and turn rubbery. Cooked egg dishes like scrambled eggs or frittata can be hit or miss – test first before batch freezing.
Egg-based sauces like mayonnaise or aioli – These emulsions split when frozen and thawed, turning oily or separated.
Fried or crispy foods – Delicate fried things like tempura, battered fish or spring rolls tend to go soggy and sad when thawed and reheated. (Note: sturdier items like schnitzels, crumbed chicken or oven-baked fries can freeze well – check the individual recipe notes.)
Creamy dairy – Yoghurt, sour cream, thickened (heavy) cream, or soft cheeses like ricotta and cream cheese often become grainy, watery or split. Full-fat dairy freezes slightly better than low-fat, but still not ideal unless used in cooking.
Cream-based sauces or leftovers – You can freeze them, but don’t expect the same texture on the other side. The sauce often splits and separates into a grainy, oil-like texture. (Useful if you’re freezing something just for yourself and don’t mind, but not great for entertaining or fussier eaters.)
How long can food be kept in the freezer?
If any of my recipes are freezable, I mention exactly how long they can safely be frozen for, but here are a few general guidelines from me – I tend to have a more conservative approach just to be on the safe side!
Cooked meals and leftovers – I prefer to use them within 2–3 months – Things like sauces with no cream, gravy, bolognese, curries, casseroles, pie filling, stews, cooked pasta, cooked rice, mashed potatoes, curry pastes, herbs in olive oil etc.
Baked goods – I prefer to use them within 2–3 months – Things like bread, wraps, muffins, cakes, cookies, tarts.
Vegetables and fruit – I prefer to use them within 8–9 months
Recommended freezing times
Below is a helpful chart from safefood.net, which provides recommended freezing times for the main food types.
Eggs – either separate the yolk and white, or beat the eggs before freezing
Up to 6 months
Cakes and baked goods without icing (frosting)
6–8 months
Bread
Up to 3 months
Raw pastry
6 months
Make sure to cool food before you freeze it!
Why do I need to cool food before freezing? If you try to freeze food before it’s properly cooled, this traps steam and can cause ice crystals, leading to freezer burn.
How long should you cool your food before freezing? The short answer is until it’s no longer hot (usually 30–60 minutes), but generally no longer than 2 hours in order to prevent bacteria growth. You could cool the food to room temperature for 30–60 minutes, then transfer it to the fridge for a short period before freezing if needed. Spreading food out in a shallow dish also helps it cool faster.
Why can’t you put hot food directly into the fridge or freezer? Putting hot food straight into the fridge or freezer raises the overall temperature inside, which can compromise the safety of other foods already frozen. It takes much longer for hot food to cool down properly in a tightly packed fridge or freezer, increasing the risk of bacteria growth. The rapid temperature change can also affect the texture and quality of certain foods.
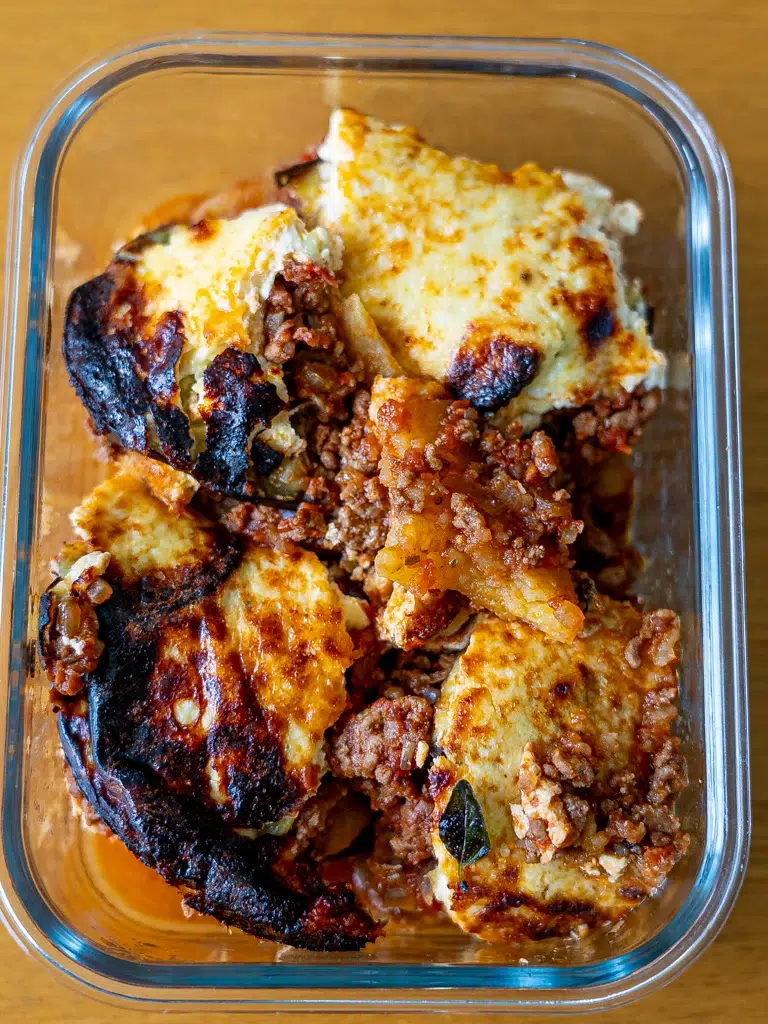
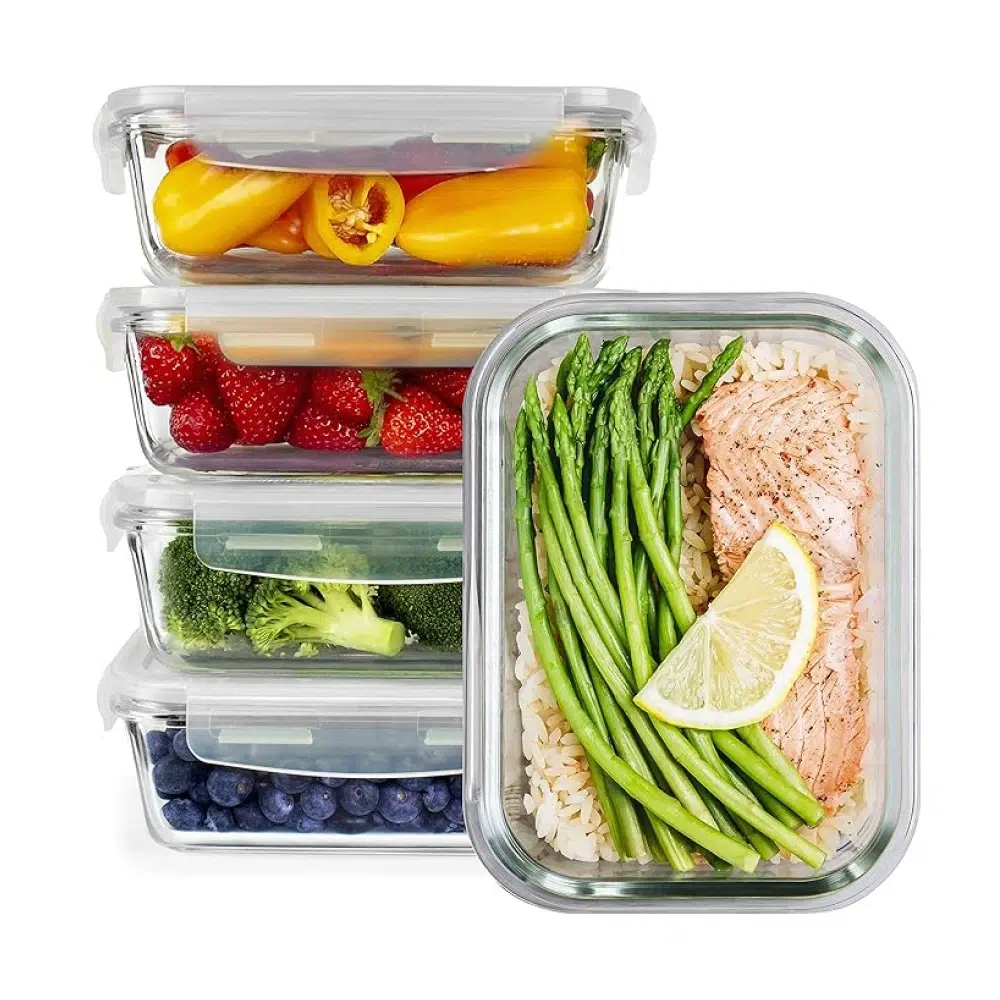
Using the right containers matters – it’s the difference between fresh-tasting dinners and freezer-burnt mystery meals. This Cheat’s Moussaka freezes and reheats like a dream when stored properly (and yes, it's as delicious as it looks).
Use the right containers
Choosing the right containers isn’t just about looking organised – it can make a big difference to how well your food freezes, how fresh it stays and how much space you save. I use stackable glass containers and reusable silicone bags because they seal tightly and help prevent freezer burn. They also make it easy to see what’s inside, which is half the battle when you’re trying to avoid the mystery meal situation
Different containers work better for different things:
Reusable silicone bags – Great for freezing flat portions of minced (ground) meat, soups, stews or sauces. Once frozen, you can stack them upright like folders to maximise space.
Freezer-safe glass containers – Perfect for stocks, broths, curry sauces, smoothies and leftovers. Just leave a little headspace for expansion (liquids expand as they freeze).
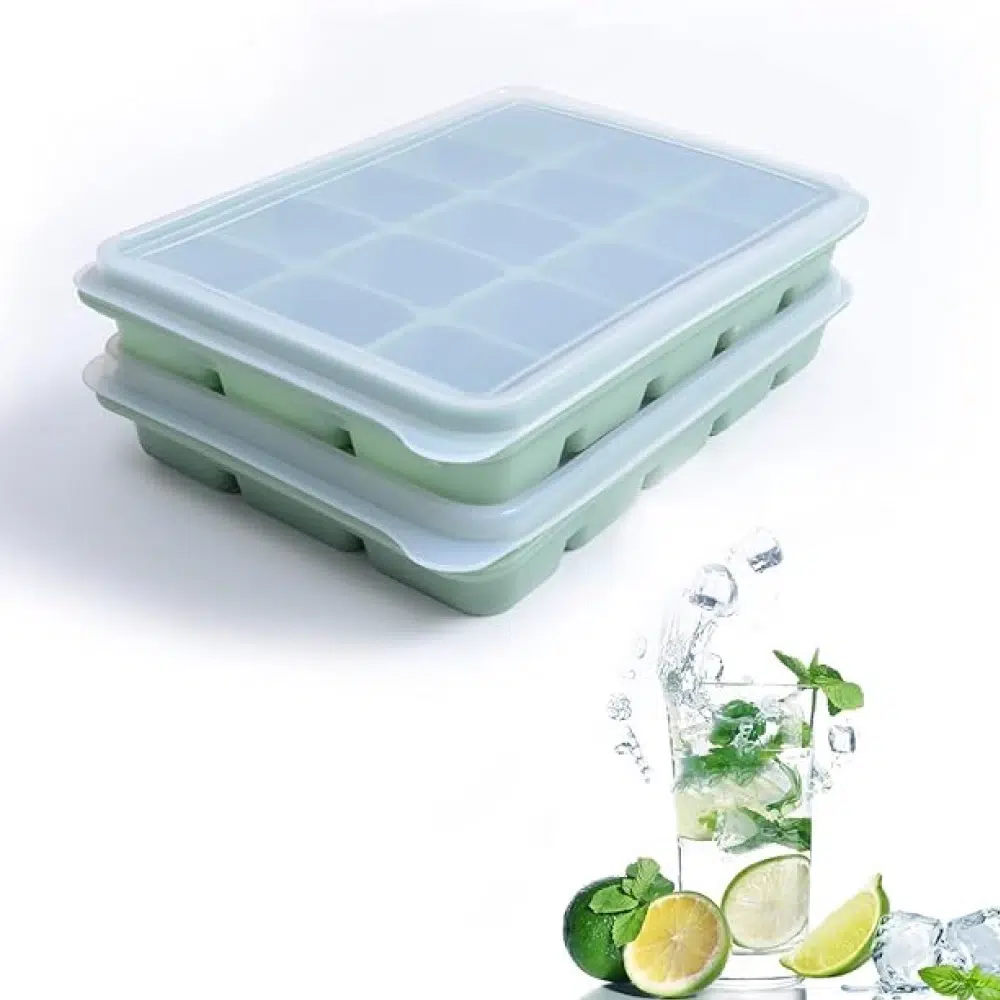
Silicone trays – Ideal for freezing smaller portions of things like pesto, curry paste, tomato paste (concentrated puree), chopped herbs in oil or baby food. Once frozen, you can pop them out and store in a bag or container.
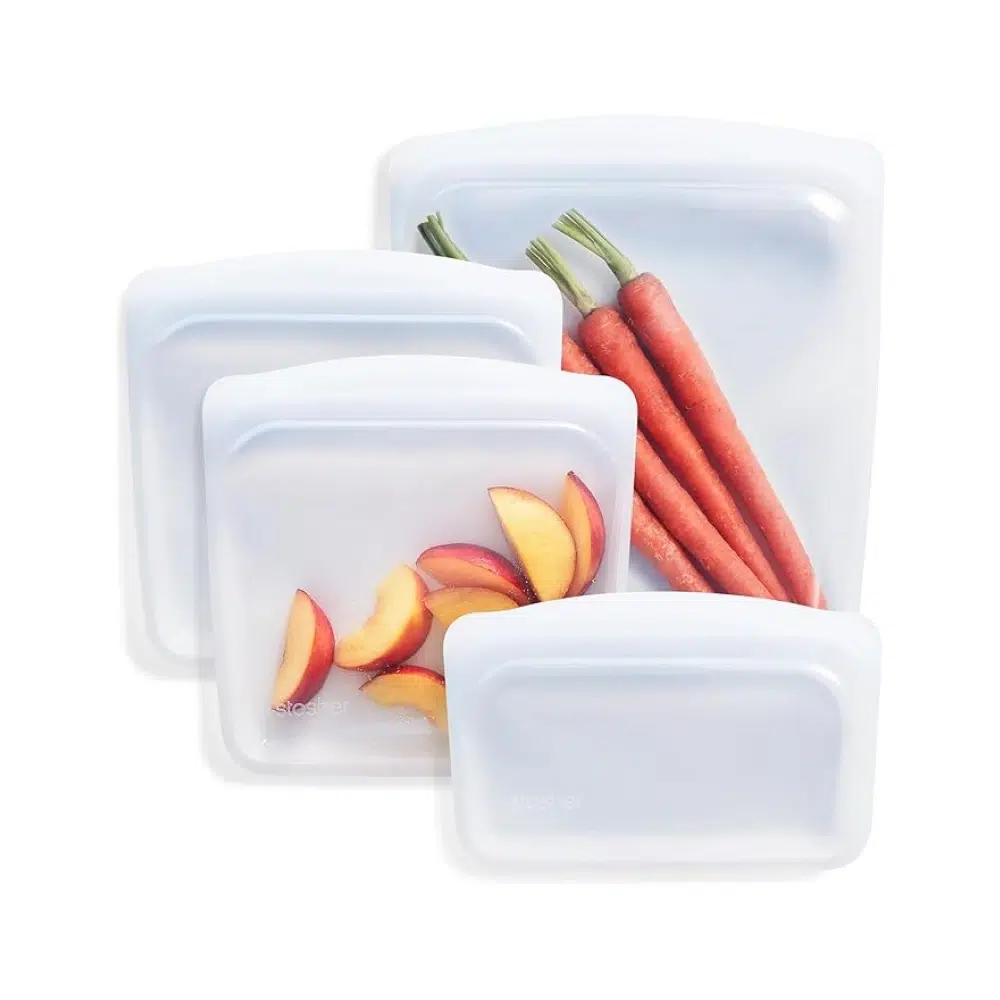
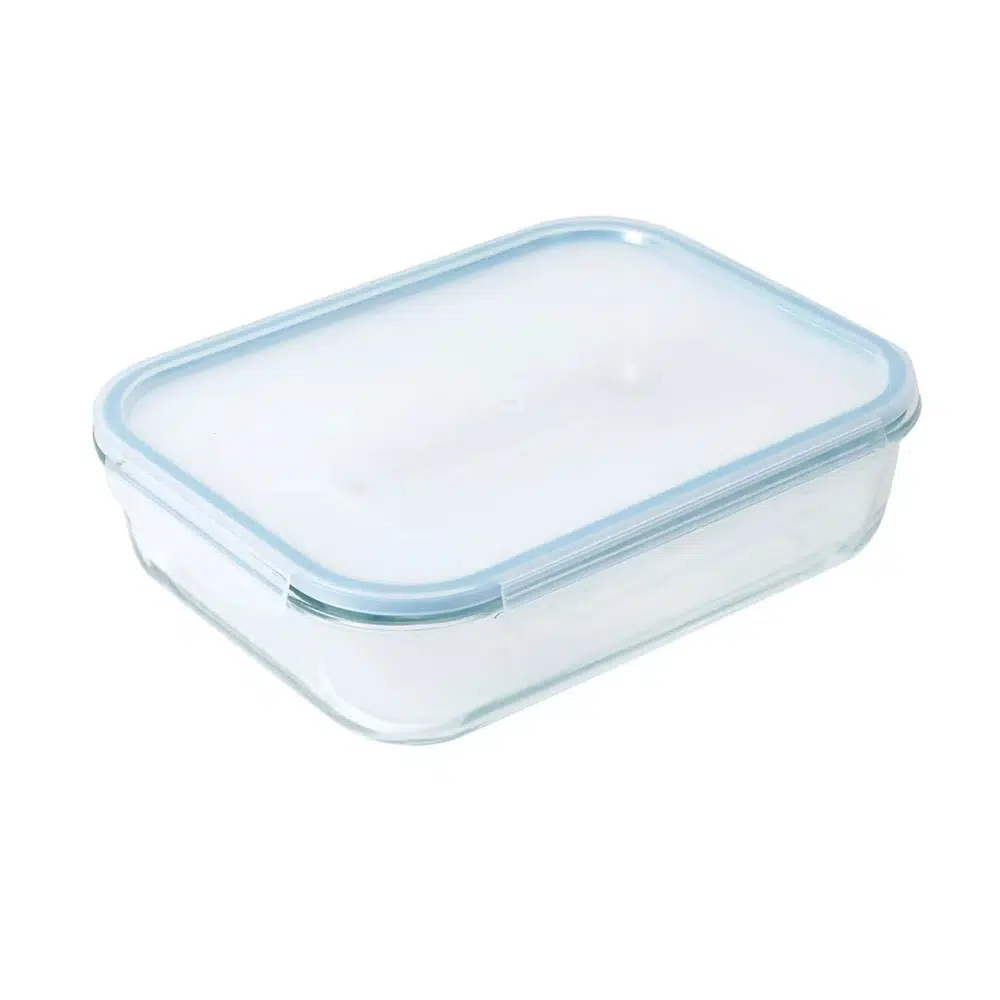
The containers you’ll find in my kitchen
These are some of the containers I use in my kitchen – there are no affiliate links, all of these products have been purchased by me and I’m sharing what’s worked for me in case it helps you too. I’ve tried to include options accessible here in Australia as well as a few other options that are easy to get whether you’re in Australia or overseas.
Most of the time, any decent freezer-safe glass containers will do the trick. The ones I’ve listed below are simply ones I’ve used (or still use) and have had no issues with – they seal well, stack neatly, and keep food fresh. No complaints!
When it comes to reusable silicone bags, I’m a little pickier. I look for bags that are freezer-friendly, dishwasher and microwave-safe, and still seal properly after a bunch of uses. Stasher bags are on the pricier side, but they tick every box and last ages – I really rate them.
Using proper containers also makes it easier to thaw only what you need, reducing waste and making weeknight dinners faster and more flexible.
What happens if I use the wrong containers? Not all containers are created equal. Some let air in, ruining your food (and also make storage difficult). Avoid cheap plastic containers that crack or let air in (I’ve been there!).
Flat freezing for the win – If freezing liquids or prepped proteins (like marinated chicken), lay them flat in silicone bags before stacking them upright.
Meatballs, dumplings or individual items like schnitzels or burger patties – Freeze on a tray first, then transfer to a bag so they don’t stick together (or with baking paper between each layers in a container to stop them sticking).
Freezing a huge lasagne in one slab seems smart until you need a meal for one person and find yourself chiselling at that slab like an archaeologist. Portion size depends how many of you are in the household. Maybe single or double portions work, or you might want enough to feed a family.
Label everything properly
If you freeze things unlabelled, your carefully frozen food will become “mystery meals” that may well land in the trash. Always write what it is and the date it was frozen. For sauces or stocks, include the volume too so you know how far they will go. It only takes a few seconds, and it saves you from guessing games later. And yes – if in doubt, chuck it out.
How to Thaw and Reheat Food
Reheating food isn’t just about blasting it until it’s hot, the method you choose can make or break the texture, flavour and overall quality of your meal. Here’s a quick guide to getting the best results:
Best thawing method
The safest and most reliable way to thaw food is in the fridge overnight. It’s slow, but that’s the point – a gradual defrost ensures the food stays at a safe temperature and reheats evenly, helping you avoid dry or rubbery textures.
When to cook from frozen
Some foods are totally fine to go straight from freezer to heat. Things like soups, stews, dumplings or pasta bakes often don’t need thawing at all. Just keep in mind that cook times will be a little longer. Refer to the leftover and make-ahead instructions in each of my recipes for exact details – I always include whether it needs to be thawed or not.
General reheating tips
Each recipe includes its own reheating method, but here are a few general rules that’ll help across the board:
Don’t overheat It’s the fastest way to end up with dry chicken or rubbery rice. Reheat just until warmed through.
Use the right method for the food:
Oven – Great for casseroles, bakes, pies or anything that needs to stay crispy. Cover with foil to prevent drying out, then remove the foil for the last few minutes if you want to crisp the top.
Stovetop – Ideal for sauces, soups, curries or stir-fries. Reheat slowly over low to medium heat and stir regularly to prevent sticking and ensure even heating.
Microwave – Best for individual portions. Reheat in short bursts (30–60 seconds), stirring in between bursts, until hot. Always use a microwave-safe container and, if it has a lid, leave it ajar to let steam escape. If reheating something in a silicone or reusable freezer bag, transfer it to a bowl or container first – don’t microwave the bag directly unless it’s labelled safe to do so.
If I’m already making this Quick Coconut Chicken Curry, I usually double it. The ingredients are already out, and future me always appreciates the backup dinner waiting in the freezer.
Making Meals to Freeze: Batch-cooking, Meal Prep and Leftovers
You love the idea of it, but where do we find the time? I take a flexible approach:
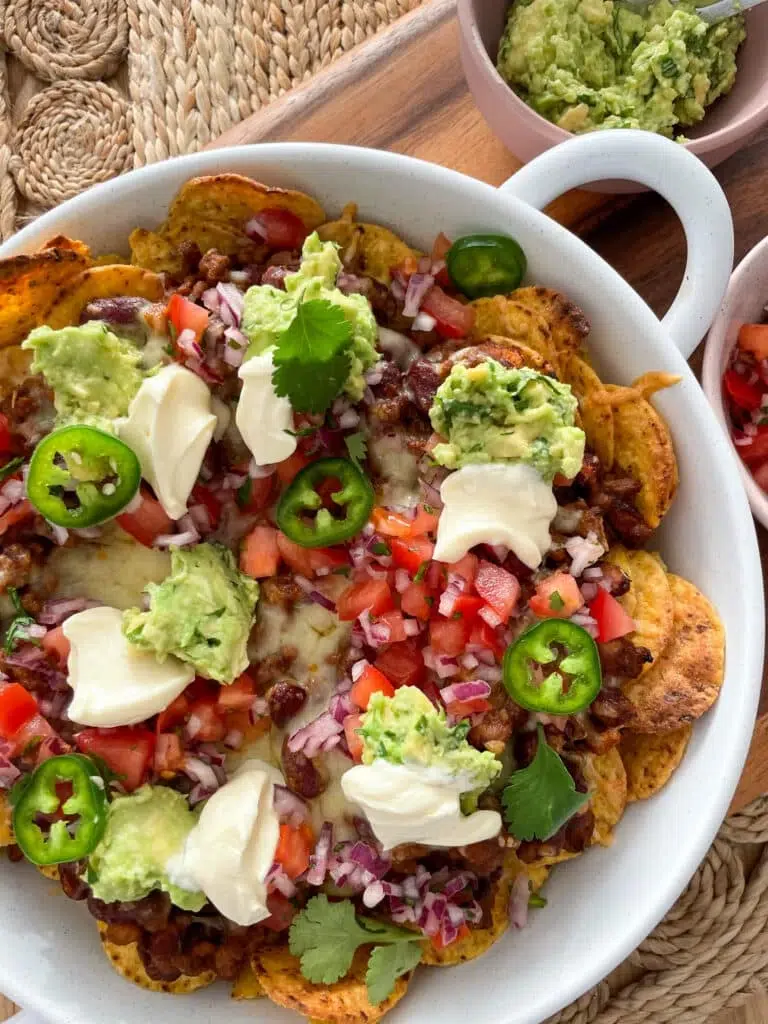
Double-batch method – If I’m already cooking, I make a double batch and freeze half. For some recipes I might only scale up one component, such as the slow-cooked chicken component of my Slow-cooker Chicken Nachos, as I know I will be able to create other meals from it, such as tacos, burrito bowls, loaded potatoes or even pizza toppings.
Get-ahead Sunday meal prep – I spend some time on my days off to prepare for the week ahead. I make a mix of fresh meals and a couple for the freezer.
Balancing fresh and frozen meals – Freezer meals are my go-tos for those nights that I know we are going to be extra busy!
Freeze to “mix and match” – If you have pasta, rice or things like schnitzels, meatballs or rissoles frozen, and then you also have a couple of frozen sauces, you can mix and match to easily create a meal.
What Are Good Meals for Freezing?
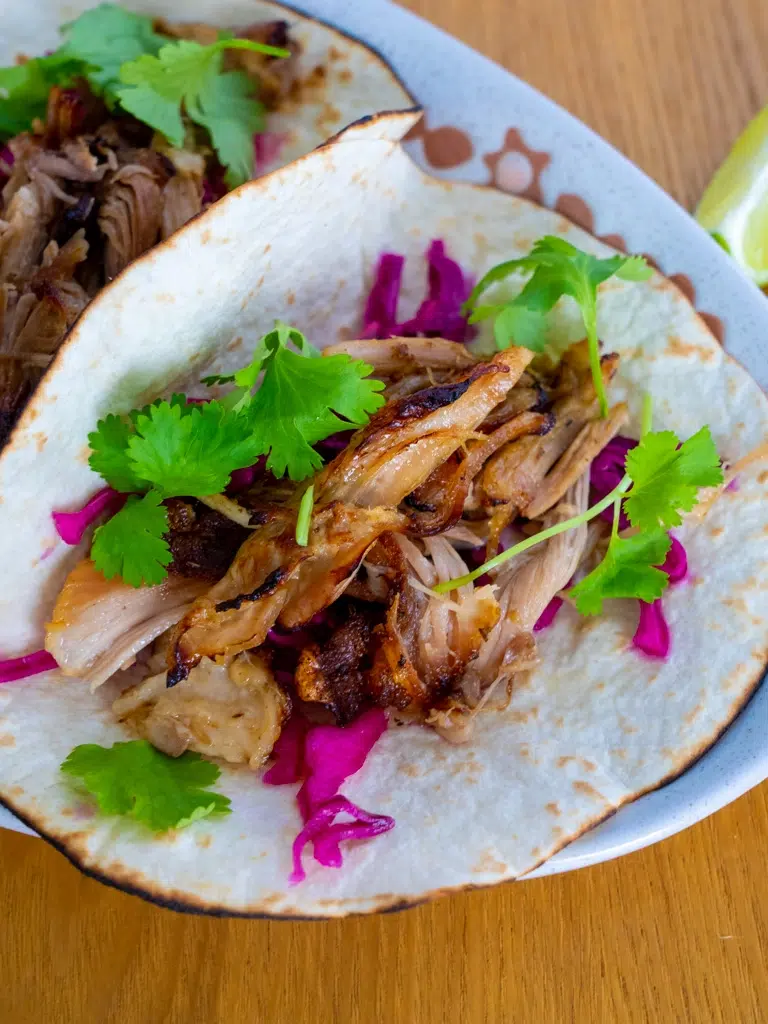
Here are some of my favourite meals to freeze. Some can be frozen as is, and some meals have valuable components (like the pulled pork from a Mexican taco, for instance) that can be frozen and repurposed in other meals.
Some other things I like to freeze to make life easier
Whenever I cook rice or pasta, I always make extra. There’s no point in boiling water twice when I can have pre-cooked pasta ready for a quick meal or portioned-out rice in the freezer, waiting to be reheated.
Cooked pasta (up to 2 months) – Cook the pasta just until al dente, drain well, toss with a little olive oil to prevent sticking, then let it cool completely. Store in a microwave-safe reusable bag or airtight container in portion sizes. To reheat, just drop it into boiling water for 30 seconds or microwave with a splash of water until heated through.
Cooked rice (up to 2 months) – Cook as usual, spread it out on a tray to cool quickly, then portion it into microwave-safe reusable bags or containers. Flattening the bags saves space and makes thawing faster. Reheat in the microwave straight from frozen with a splash of water to steam it back to life.
Left-over sauces or curry bases (up to 3 months) – Freeze in small portions (ice cube trays work well for this) so you can thaw just what you need.
Fresh ginger (up to 3 months) – Store whole, washed fresh ginger in a reusable bag or small container. It can be used straight from frozen – no need to thaw, just use a Microplane to grate on demand! It doesn’t even need to be peeled, unless of course you want to.
Sliced sourdough (up to 3 months) – Slice before freezing and store in a snaplock bag. Toast straight from frozen or let it sit on the counter for 5–10 minutes before using.
Fresh herbs like coriander (cilantro) and parsley (up to 2 months) – Blend with a little oil and freeze in ice cube trays, ready to toss into soups, sauces or stir-fries.
I would love some more detail on what container/dish you use to freeze things like a premade lasagna/pie. I would love to have this ready to pop in the oven for the fam on my workdays. In the past I’ve used a disposable BBQ dish, but from above maybe this isn’t the best choice.
Hi Michelle, if you look at the article again and scroll down to THE CONTAINERS YOU’LL FIND IN MY KITCHEN, you’ll see images of the containers. Click on the images and you will be taken to the websites where you can find out more. I hope this helps! Nic x
Hi Giselle, you’re not imagining it – some people do notice a soapy taste with silicone, especially after dishwasher use. I find it’s more likely if there’s strong detergent involved or if the silicone is washed alongside heavily scented items. I recommend using a mild, fragrance-free detergent and, if needed, giving silicone a quick rinse or hand wash. Nic x
Hi Sheryl, you can just print out from your computer as you would any other document. So when the print dialog box comes up after you choose ‘print’, you can either print a hard copy to your printer or go down to the pdf settings and choose to save as a pdf. I hope this helps! Nic x
For recipes labelled ‘gluten-free’ or ‘dairy-free’, the ingredients included in the recipe are typically gluten- or dairy-free. However, it is the user’s responsibility to carefully check the ingredient panels on the specific brands of products purchased and used. Simple Home Edit cannot be held responsible for any adverse reactions.


Michelle says:
I would love some more detail on what container/dish you use to freeze things like a premade lasagna/pie. I would love to have this ready to pop in the oven for the fam on my workdays. In the past I’ve used a disposable BBQ dish, but from above maybe this isn’t the best choice.
Nicole says:
Hi Michelle, if you look at the article again and scroll down to THE CONTAINERS YOU’LL FIND IN MY KITCHEN, you’ll see images of the containers. Click on the images and you will be taken to the websites where you can find out more. I hope this helps! Nic x
Giselle says:
This is amazing, I’m just curious if you find that anything silicone makes the food taste soapy after you’ve washed them in the dishwasher?
Nicole says:
Hi Giselle, you’re not imagining it – some people do notice a soapy taste with silicone, especially after dishwasher use. I find it’s more likely if there’s strong detergent involved or if the silicone is washed alongside heavily scented items. I recommend using a mild, fragrance-free detergent and, if needed, giving silicone a quick rinse or hand wash. Nic x
Sheryl says:
Can all the above be easily printed out…like a pdf document so I have a hard copy please
Nicole says:
Hi Sheryl, you can just print out from your computer as you would any other document. So when the print dialog box comes up after you choose ‘print’, you can either print a hard copy to your printer or go down to the pdf settings and choose to save as a pdf. I hope this helps! Nic x